Day 72
If judged by the budget included with my OAC Project proposal, the last actual 'grant day' would have been 43 days ending April 26. I decided to extend the project work to cover two last major elements. One was the iron smelt covered in the last couple of posts here. The second was an academic paper to be delivered at the International Congress on Medieval Studies at Kalamazoo Michigan. The conference ran from May 9 - 13, with my specific paper to be presented Thursday May 10.
I've referenced the paper itself in an earlier posting here. I had given a first draft version at Forward Into the Past at Laurier University on March 31. Obviously I consider the various public presentations of both research and practical method, plus ongoing communications like this blog an esencial part of the entire Bloom to Bar project.
The revised text of my paper 'An Iron Smelt in Vinland' will be eventually be published. Session organizers Ken Mondschein and Michael Cramer are working with Freelance Academy Press to collect a number of papers from the past 'If Those Bones Could Talk' sessions into a volume.
Not to get too (!) side tracked, what I wanted to detail here was some other excellent reference sources for those seriously interested in bloomery iron smelting.
Method :
A Practical Treatise on the Smelting and Smithing of Bloomery Iron
Lee Sauder & Skip Williams
Historical Metallurgy, vol. 36 (2). 2002
A version will be available by hunting around on Lee's Iron Smelting site
If You Don't Get any IRON...
Darrell Markewitz
EXARC. vol. 2012-1
Available on line (with subscription)
Remember there are some links to instructional methods to your top right!
References :
Iron in Archaeology - The European Bloomery Smelters
Radomir Pleiner
80-86124-26-6
David Brown Books in the US is currently contacting the original publisher to see if they can acquire some copies of this volume. They are also attempting to get some of Pleiner's 'Iron in Archaeology, Early European Blacksmiths / 808612462-2'
Prehistoric & Medieval Direct Iron Smelting in Scandinavia and Europe
Lars Christian Norbach
13 9788772887746
Available from ISD Distributing
The book costs $60 plus shipping
Iron and Steel in Ancient Times
Vagn F. Buchwald
8773043087
Available from the Danish Royal Academy
The book costs 60, 56 Euros plus 21,4 Euros (to Canada).
Contact Katrine Hassenkam Zoref

In 2012 Darrell Markewitz of the Wareham Forge applied for - and received - a grant from the Ontario Arts Council. The purpose of this Craft Project - Creation and Development Grant was defined : "... is to cover three months of dedicated time to allow me to develop a practical understanding of how to convert ten year's production of raw iron blooms into working bars". This blog will be an ongoing record of this project...
Showing posts with label iron smelting. Show all posts
Showing posts with label iron smelting. Show all posts
Monday, May 14, 2012

Sunday, May 6, 2012
'Production Smelt' - RESULTS
(Day 65)
I would refer you back to yesterday's post for the details of the set up for this smelt.
The first thing is don't do this alone.
You *can* run a successful smelt as a lone individual. It is however a massive amount of work.
- I spent a half day clearing out an old furnace and preparing the area and laying the base.
- Then a fairly long day preparing, mixing clay and building the furnace.
(Roasting ore was done separately, but the two batches there could have been undertaken during the work sessions above).
- Another half day gathering up the roasted ore, setting the tuyere and running a slow drying fire. I broke up 3/4 of the ore at the same time.
Smelt day, I broke charcoal while the first stages of pre-heat (with wood) was taking place.
I started that day at 8 am gathering tools and getting them out and arranging the work site.
The pre-heat was extended to allow time to break that charcoal (64 kg worth / 8 bags).
The main smelt sequence itself ran over 7 1/2 hours, from first charcoal fill to start of the extraction. In the end I decided to use all of the 'Jamestown Brown' ore that I had roasted and crushed. The total ore added was just under 42 kg. The total charcoal consumed was 55 kg (7.5 full 8kg bags, before breaking). I had a real hard time getting this bloom free. I ended up having to break way 2/3 of the slag mass by chiselling it off in small pieces. I really have no clear concept of how long this took, but working down inside the hot furnace was absolutely exhausting. My guess is that I was at it at least a half hour.
The total smelting session took 13 hours!
So by the time I pulled the bloom free, the bloom had
cooled considerably. I did try to work over the surface with a 5 lb
hand sledge. This did knock some of the clinging slag 'mother' free, but
really was not effective in compacting the metal itself. I tried a fast
weight measurement, but frankly I think the reading was not all that
accurate. (What I recorded was 12.27 kg). Frankly, this is a much larger
bloom than I normally make.
I rushed the bloom back from the rear yard
into the workshop. I had started my two burner gas forge before I
started the extraction, but there was no way the mass would fit.
Although the bloom was closer to a red heat at this point, I quickly
started the hydraulic press. I made a partial compaction, but it was
obvious that the bloom was far too cold, and several larger pieces broke
free. I swapped in the cutting head and made a cut from both sides,
most the way through.
At this point I might have been able to get the individual 'half'
sections into the gas forge, but frankly, I was way past too beat to
work.
This morning, I was able to pull the scored bloom off the floor, and sweep with a magnet to recover any fragments.
The main bloom itself now weighs a quite respectable 8.83 kg.
I recovered another 1.46 kg of fragments. Two pieces are a good size (at 501 and 324 gms) and look solid enough that I should be able to work them down to smaller bars.
The overall yield (using the 10.3 kg total recovered) comes to roughly 24 %.
The furnace itself, despite all the pounding and prodding, was found to be in remarkably great shape the next morning. There is one very small crack right near the top edge, but otherwise the shaft is in perfect shape.
The copper tuyere might have melted just a tiny bit. I'll have to measure it to be sure. The wall around the tuyere did errode a slight amount, but it does not look more than a centimetre or two.
After a small amount of cleaning up, I'm certain it will be quickly ready for another use (Thanks Lee!)
(very) Tired but happy
(but let's get more of the gang here *next* time I decide to try this...)
This post a duplicate from Hammered Out Bits
I would refer you back to yesterday's post for the details of the set up for this smelt.
 |
| Furnace in use |
You *can* run a successful smelt as a lone individual. It is however a massive amount of work.
- I spent a half day clearing out an old furnace and preparing the area and laying the base.
- Then a fairly long day preparing, mixing clay and building the furnace.
(Roasting ore was done separately, but the two batches there could have been undertaken during the work sessions above).
- Another half day gathering up the roasted ore, setting the tuyere and running a slow drying fire. I broke up 3/4 of the ore at the same time.
Smelt day, I broke charcoal while the first stages of pre-heat (with wood) was taking place.
I started that day at 8 am gathering tools and getting them out and arranging the work site.
The pre-heat was extended to allow time to break that charcoal (64 kg worth / 8 bags).
The main smelt sequence itself ran over 7 1/2 hours, from first charcoal fill to start of the extraction. In the end I decided to use all of the 'Jamestown Brown' ore that I had roasted and crushed. The total ore added was just under 42 kg. The total charcoal consumed was 55 kg (7.5 full 8kg bags, before breaking). I had a real hard time getting this bloom free. I ended up having to break way 2/3 of the slag mass by chiselling it off in small pieces. I really have no clear concept of how long this took, but working down inside the hot furnace was absolutely exhausting. My guess is that I was at it at least a half hour.
The total smelting session took 13 hours!
 |
| Slag mass, the furnace just opened. |
 |
| Hot bloom mass - after hand hammering |
 |
| Main bloom, cold and after sectioning |
The main bloom itself now weighs a quite respectable 8.83 kg.
I recovered another 1.46 kg of fragments. Two pieces are a good size (at 501 and 324 gms) and look solid enough that I should be able to work them down to smaller bars.
The overall yield (using the 10.3 kg total recovered) comes to roughly 24 %.
The furnace itself, despite all the pounding and prodding, was found to be in remarkably great shape the next morning. There is one very small crack right near the top edge, but otherwise the shaft is in perfect shape.
The copper tuyere might have melted just a tiny bit. I'll have to measure it to be sure. The wall around the tuyere did errode a slight amount, but it does not look more than a centimetre or two.
After a small amount of cleaning up, I'm certain it will be quickly ready for another use (Thanks Lee!)
(very) Tired but happy
(but let's get more of the gang here *next* time I decide to try this...)
This post a duplicate from Hammered Out Bits
Saturday, May 5, 2012
A Production (?) Smelt
(Day 64)
Although technically I am past the end date for the OAC Project Grant, one of the things I wanted to include was building a more production type furnace and running a test smelt.
As I had detailed in an earlier post, this furnace would include a number of features 'borrowed' from the furnaces that Lee Sauder has been using recently. (This a nice switch, as had focused primarily on clay construction earlier in my development.)
The main features of this new furnace are:
You can see the layout includes a very deep base
area, a total of 28 cm from the centre of the tuyere tip to the hard
base. When set up for a smelt, the lower 12 cm or so will be filled with
charcoal fines. The furnace also has a much larger tap arch. Taken
together, this should allow for possible bottom extraction of the final
bloom.
The furnace is set on the upper level of the normal smelting area at Wareham. This does make it a bit tall for top extraction (top of the furnace is chest high on me). The advantage is that the bottom of the furnace is set about 18 inches off the ground, making it easier to work tapping or slag bowl modification.
This furnace will use the new forged copper tuyere (detailed here).
The interior view above was taken before the drying fire was started.
You can see the usual insert tuyere position, 5 cm proud of the interior
wall and set to 23 degrees down angle. The flat brick seen the bottom
is supporting the tap arch at this point (the clay was still damp).
Earlier in this week I had spent part of two
afternoons roasting up ore. I still have a quantity of 'Jamestown
Brown', a water deposited ore from that location in Virginia. A number
of years back, a group of us were invited to pick some of this material
that lay in a large sand bank at the rear of a rural
blacksmith/gunsmith's property. Sheldon Browder & Steve Mankowski
(from Colonial Williamsburg) have used this ore repeatedly since with
good results.
Late yesterday afternoon and early evening I started preparing the smelting area. I started a gentle drying fire using small wood splits inside the furnace. That process continued for several hours. At the same time I sorted out the work area for today's smelt. As well I continued crushing the ore I had roasted over the last week. The ore does seem a bit 'sandy' to me, with a visible variation in iron concentration and form. At worst this may mean some extra slag tapping, but the new furnace layout should provide for this.
Its looking like I may be running this smelt today single handed. Although I have done this (once!) before, I'm expecting a hard day. Lets hope nothing goes seriously wrong with this new furnace.
Stay tuned...
This post duplicated from Hammered Out Bits
Although technically I am past the end date for the OAC Project Grant, one of the things I wanted to include was building a more production type furnace and running a test smelt.
As I had detailed in an earlier post, this furnace would include a number of features 'borrowed' from the furnaces that Lee Sauder has been using recently. (This a nice switch, as had focused primarily on clay construction earlier in my development.)
The main features of this new furnace are:
use of a copper tuyere
base area built of fire brick
metal sheathing over the shaft
use of sand / horse manure / clay mix
 |  |
| Layout with dimensions | Before drying fire. |
The furnace is set on the upper level of the normal smelting area at Wareham. This does make it a bit tall for top extraction (top of the furnace is chest high on me). The advantage is that the bottom of the furnace is set about 18 inches off the ground, making it easier to work tapping or slag bowl modification.
 |
| Furnace interior, showing tuyere tip |
 | ||
| Ore Roasting |
Late yesterday afternoon and early evening I started preparing the smelting area. I started a gentle drying fire using small wood splits inside the furnace. That process continued for several hours. At the same time I sorted out the work area for today's smelt. As well I continued crushing the ore I had roasted over the last week. The ore does seem a bit 'sandy' to me, with a visible variation in iron concentration and form. At worst this may mean some extra slag tapping, but the new furnace layout should provide for this.
Its looking like I may be running this smelt today single handed. Although I have done this (once!) before, I'm expecting a hard day. Lets hope nothing goes seriously wrong with this new furnace.
Stay tuned...
This post duplicated from Hammered Out Bits
Friday, April 20, 2012
Building a PRODUCTION Iron Smelting Furnace
Day 58
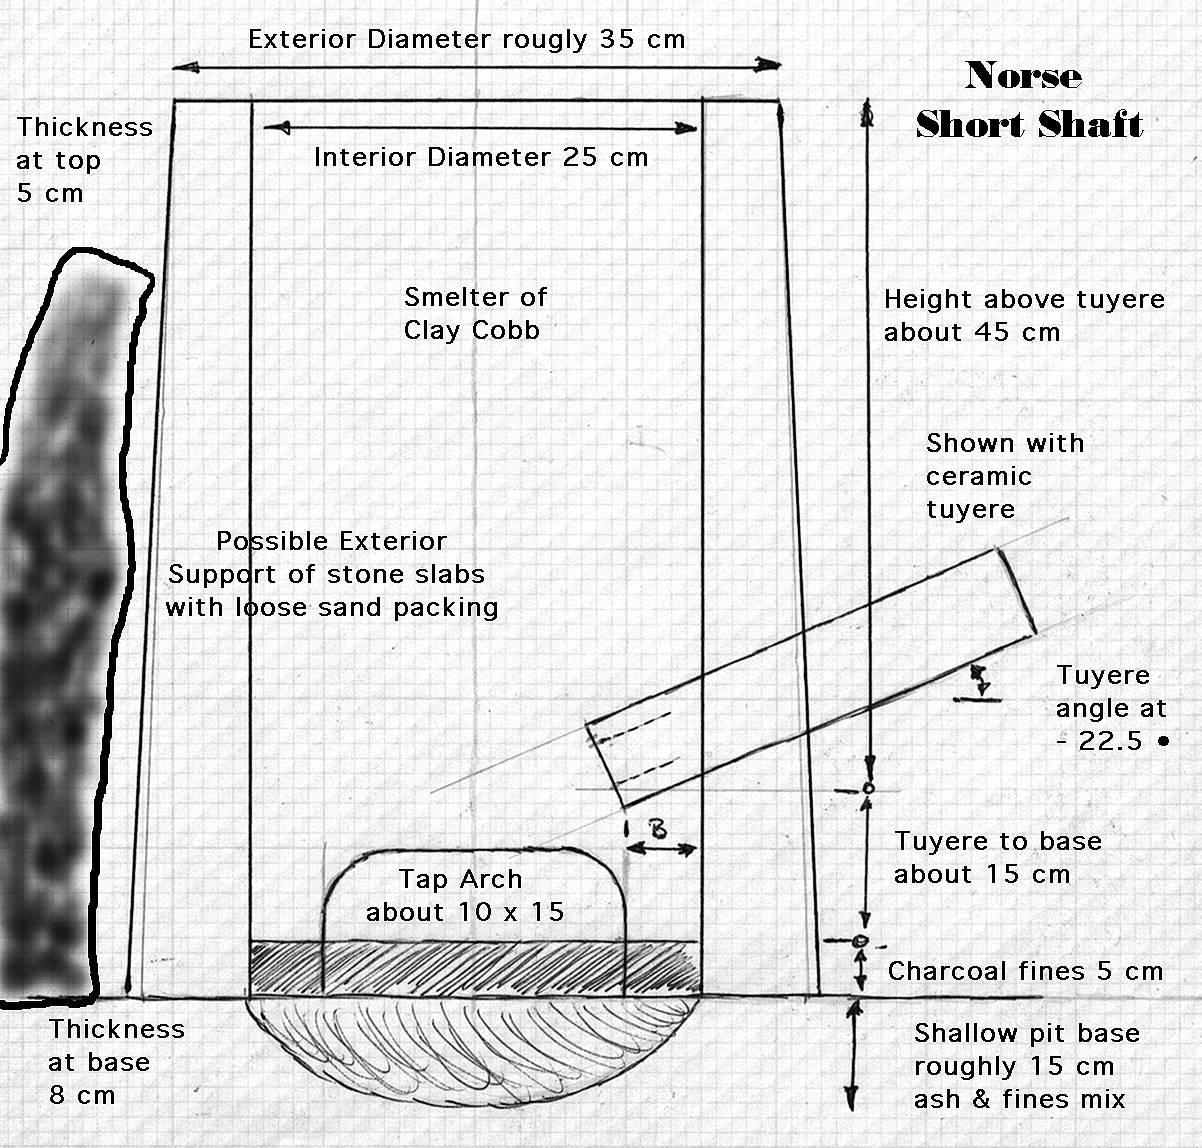
Making a bloom requires an iron smelting furnace. I have built dozens over the years, most on the 'Norse Short Shaft' model. The work on the actual smelting end (creation of the iron blooms) has been a combination of a learning process extended into experimental archaeology. Furnaces are often purpose built to test a specific variable, and commonly only used one or two times.
I have decided to take the opportunity offered by the OAC project grant to build a more durable 'production' version furnace.
The first day's work consisted of gathering the available supplies and possible pieces, plus cleaning up and preparing the site. The furnace built for last year's 'slag pit' experiments was examined to see if it could be simply repaired.
The nature of recording the slag pit experiments had meant picking up and moving the furnace itself after each smelt. The furnace had been returned to a prepared base and covered over with a plastic drum for the winter. The combination of all that shifting, and the winter weather, had resulted in a fair amount of damage. This certainly could have been repaired, but I decided to build a brand new furnace.
There would be a number major elements used for the production furnace which should combine to greatly increased durability :
One of the things kicking around the shop was an old metal trash barrel, with the bottom pretty much rusted out. It was roughly 60 cm tall and about 35 cm diameter at the small end. Almost exactly the same size as the exterior of a short shaft furnace. I decided to use this as a combination form and protective shell for the upper shaft. The base area would be built from a circle of dense fire brick, both for durability and stability.
The furnace was constructed on the shelf that makes up one edge of the Wareham smelting area. This places the bottom base of the furnace up about 25 cm above the working floor. To create a hard bottom and stable surface, a (broken) concrete paving slab was placed first. The furnace is being constructed with a large tap arch - large enough to allow for possible bottom extraction of the bloom (although my normal method is a top extraction). The location of the tuyere will be to the left hand side as seen above. The placement of the fire bricks on edge creates a heavy and flat surface for the shaft of the furnace to rest on. The circle of standard construction bricks defines the boarder between the furnace and the natural earth surface.
The first layer of clay was a mix of 50 / 50 rough sand and standard ball clay (mixes by volume). This was used as a mortar to fill the wedge shaped gaps between individual bricks. Next the space between the firebrick circle and the outer retaining bricks was filled. Finally a sloped shoulder was created from clay to the top of the fire brick layer. A full bag of clay was required here.
Next, the bottom of the metal barrel was cut out. A slot was cut on one side, roughly 7.5 x 7.5 cm. This would be the hole allowing for the insertion of the tuyere later. The measurement from the top of this hole to the top of the barrel was 40 cm. (When positioned, the angle of the tuyere will place its tip even lower, so there should be a good 50 cm of stack height.)
The furnace walls were composed of a mixture of course sand, shredded dry horse manure and clay. The clay used was 'New Foundry' - a higher firing temperature clay (which I had gotten from Lee Sauder). The ratio is roughly 25 / 25 / 50. This is mixed dry by hand before the water is added. (I took considerable care to make sure the mixture was fairly stiff, particularly with the first layer.) The material was kneaded up to an even consistancey, then hand wedged into balls and left to stand for about an hour before applying. (Note that Lee recommends letting the clay stand overnight to even out the moisture content. Yes - I did rush this a bit!)
The individual balls were broken in half, with the individual pieces blended in carefully as the walls were built up. The metal form allowed to exert good pressure, but still keeps the overall shape consistent (and under control!) The thickness of the walls was kept to roughly 6 cm at the bottom, thinning slightly to closer to 5 cm at the top. You can see how the interior diameter is matched to the ring of fire bricks.
Because the metal barrel tapers, the interior diameter of the furnace will taper slightly as well. This is actually ideal, as it moves the tuyere tip slightly off the direct line of ore falling inside the furnace. (We have seen this arrangement reduces the amount of slag that collects on the tuyere tip.)
I finished up a long working day just as the sun was getting close to the horizon and the black flies were starting to come out. Expect some images of the final construction, once the clay has had a couple of days to stiffen up and I mount the tuyere.
Making a bloom requires an iron smelting furnace. I have built dozens over the years, most on the 'Norse Short Shaft' model. The work on the actual smelting end (creation of the iron blooms) has been a combination of a learning process extended into experimental archaeology. Furnaces are often purpose built to test a specific variable, and commonly only used one or two times.
I have decided to take the opportunity offered by the OAC project grant to build a more durable 'production' version furnace.
The first day's work consisted of gathering the available supplies and possible pieces, plus cleaning up and preparing the site. The furnace built for last year's 'slag pit' experiments was examined to see if it could be simply repaired.
 |
| Damage to top of Fall 2011 furnace |
There would be a number major elements used for the production furnace which should combine to greatly increased durability :
use of a copper tuyere
base area built of fire brick
metal sheathing over the shaft
use of sand / horse manure / clay mix
 |
| Part way through construction, with measurements |
 |
| Firebrick base as laid out |
 | |
| Brick layer with clay fill |
The first layer of clay was a mix of 50 / 50 rough sand and standard ball clay (mixes by volume). This was used as a mortar to fill the wedge shaped gaps between individual bricks. Next the space between the firebrick circle and the outer retaining bricks was filled. Finally a sloped shoulder was created from clay to the top of the fire brick layer. A full bag of clay was required here.
Next, the bottom of the metal barrel was cut out. A slot was cut on one side, roughly 7.5 x 7.5 cm. This would be the hole allowing for the insertion of the tuyere later. The measurement from the top of this hole to the top of the barrel was 40 cm. (When positioned, the angle of the tuyere will place its tip even lower, so there should be a good 50 cm of stack height.)
 |
| Dry measures for the clay mixture |
 |
| First wall layer applied (tap arch at bottom right) |
Because the metal barrel tapers, the interior diameter of the furnace will taper slightly as well. This is actually ideal, as it moves the tuyere tip slightly off the direct line of ore falling inside the furnace. (We have seen this arrangement reduces the amount of slag that collects on the tuyere tip.)
I finished up a long working day just as the sun was getting close to the horizon and the black flies were starting to come out. Expect some images of the final construction, once the clay has had a couple of days to stiffen up and I mount the tuyere.
Friday, April 13, 2012
Forging a Copper Tuyere
Day 54
This is a note of the work undertaken on Wednesday April 11 (Day 52).
Lee Sauder had this to say about his use of a copper tuyere:
Last year at Quad State, I had picked up a large bar of copper, 2 x 1 1/2 x 12 inches. (Luckily, I paid less than current scrap prices = $20.) I had actually intended this material for an artistic forging project, but like many good intentions, the piece got tucked away and pretty much forgotten.
With the reminder caused by the slag rings recovered at Smeltfest this year, and wanting a break from the heavy forge work this week, I pulled that block out. The starting weight was 4358 gm.
The first step was to combine draw, widen and flatten the material to a rough flat bar. This was done under the air hammer - mainly 'pushing' the material under the dies. (Starting at the far end, and pushing the material back towards the tong end as the dies collapsed it.)
Copper is wonderful material forge! It is extremely soft at a dull red colour, and even when the temperature drops, it remains soft and workable. This softness also means less vibration shock back into your hands. The big problem is heating a large piece. Heating in the propane gas forge, I was never able to get it much more than a 'bright red'. The end of the material hanging out of the forge was radiating off heat almost as fast as the burners were applying it.

At the end of the first stage, I had a flat bar roughly 1/2 inch thick, 3 inches wide, and about 20 inches long. You can see most of the thickness had been transferred to length, working on the flat die on the air hammer. In the image you can see how I cut off the last 4 1/2 inches (955 gm) of material.
The remaining piece was forged to a taper, both in thickness and width, over its length. This was done in a number of steps. Initially the material was worked by placing it to 90 degrees to the long axis of the dies. Next the surface was worked under a Hoffi style crowning top die. This was followed by a fair amount of working the surface with the cross peen. Again the direction of the peening was done at 90 degrees to the long axis of the material. The net effect here (for the non blacksmiths) is to primarily force the material side to side - not end for end. Last, the surface was worked with the forging hammer to smooth out all the irregularities caused by using the peen on such soft material. At this point the edges were also hammered to create a more or less even and straight lines.
This all created a shape like a triangle with the tip cut off. To finish the work, the peen was again used, but now over a half cylinder shaped anvil tool. Also it proved just as easy to work into the hollow created by the step from horn to face on the right hand edge of the anvil. This series of more gentle strokes gradually formed the flat surface into a half curve. This was carefully rolled up to where the two edges met - creating a conical form.
This was then worked to ensure the shape was symmetrical, and straight.

The resulting tuyere is 45 cm long. Its finished weight is 3394 gm.


This is a note of the work undertaken on Wednesday April 11 (Day 52).
Lee Sauder had this to say about his use of a copper tuyere:
I had made a first attempt to try out a copper tuyere for my own smelts # 7, #8, # 12 in 2005. My problem was at the time I did not have suitable copper material to work with. I had tried cutting and forming from 1/8 inch thick copper sheet. That thickness just was not enough to either withstand the furnace temperatures or transmit heat off fast enough to prevent erosion of the tip. Work with copper tuyeres was abandoned in favour of using a standardized ceramic tube (starting in 2006).1) The original inspiration to try the copper came from the Catalan furnace descriptions. I tried it the first time I tried the flue tile, after the first Early Iron at Cooperstown, so I guess that would have been late ‘04 or early ‘05. I have used them almost exclusively since, with the Coated Tyle furnaces, the Cadhinos, the big steel and refractory Aphrodite, and all the clay furnaces.2) I have found that they will melt if they are much less than 14 inches long (this is with about 2.5 inches protruding into the furnace).3) I looked back through my notes, I think I used the last tuyere for 45 smelts before I retired it, but I’m not sure. It didn’t fail, it was gradually thinning, and I didn’t trust it anymore.
Last year at Quad State, I had picked up a large bar of copper, 2 x 1 1/2 x 12 inches. (Luckily, I paid less than current scrap prices = $20.) I had actually intended this material for an artistic forging project, but like many good intentions, the piece got tucked away and pretty much forgotten.
With the reminder caused by the slag rings recovered at Smeltfest this year, and wanting a break from the heavy forge work this week, I pulled that block out. The starting weight was 4358 gm.
The first step was to combine draw, widen and flatten the material to a rough flat bar. This was done under the air hammer - mainly 'pushing' the material under the dies. (Starting at the far end, and pushing the material back towards the tong end as the dies collapsed it.)
Copper is wonderful material forge! It is extremely soft at a dull red colour, and even when the temperature drops, it remains soft and workable. This softness also means less vibration shock back into your hands. The big problem is heating a large piece. Heating in the propane gas forge, I was never able to get it much more than a 'bright red'. The end of the material hanging out of the forge was radiating off heat almost as fast as the burners were applying it.

After the initial flattening
(sorry for poor image quality)
(sorry for poor image quality)
At the end of the first stage, I had a flat bar roughly 1/2 inch thick, 3 inches wide, and about 20 inches long. You can see most of the thickness had been transferred to length, working on the flat die on the air hammer. In the image you can see how I cut off the last 4 1/2 inches (955 gm) of material.
The remaining piece was forged to a taper, both in thickness and width, over its length. This was done in a number of steps. Initially the material was worked by placing it to 90 degrees to the long axis of the dies. Next the surface was worked under a Hoffi style crowning top die. This was followed by a fair amount of working the surface with the cross peen. Again the direction of the peening was done at 90 degrees to the long axis of the material. The net effect here (for the non blacksmiths) is to primarily force the material side to side - not end for end. Last, the surface was worked with the forging hammer to smooth out all the irregularities caused by using the peen on such soft material. At this point the edges were also hammered to create a more or less even and straight lines.
This all created a shape like a triangle with the tip cut off. To finish the work, the peen was again used, but now over a half cylinder shaped anvil tool. Also it proved just as easy to work into the hollow created by the step from horn to face on the right hand edge of the anvil. This series of more gentle strokes gradually formed the flat surface into a half curve. This was carefully rolled up to where the two edges met - creating a conical form.
This was then worked to ensure the shape was symmetrical, and straight.

Finished copper tuyere
The resulting tuyere is 45 cm long. Its finished weight is 3394 gm.

Furnace End
2.5 cm internal diameter
wall thickness 6 mm
2.5 cm internal diameter
wall thickness 6 mm

Air Input End
5 cm total diameter (accepts standard 1 1/2 inch threaded pipe)
wall thickness 3 mm
5 cm total diameter (accepts standard 1 1/2 inch threaded pipe)
wall thickness 3 mm
Thursday, April 12, 2012
Credit where Credit is Due!
Day 53
Setting the Record Straight!
Part of the project grant was specifically to cover my participation in Smeltfest 2012, hosted by Lee Sauder at his Germinal Ironworks outside Lexington Virginia.
Lee, assisted by his close friend and smelting partner Skip Williams, started investing historic bloomery iron smelting methods in the 1990's. They were initially inspired by African models, then worked backwards to establish a functional and predictable technique.
 Sauder & Williams, pulling a bloom from their 'African Queen' furnace.
Frontier Culture Museum, Stauton VA - 2002
I had the good fortune to meet Lee and Skip in Fall of 2002. I had only undertaken two smelts at that point, both unsuccessful. They were extremely generous with their knowledge and folding my small group (other members of DARC) into their demonstration. Although we did little more than help with some of the 'dirty jobs' I certainly learned an immense amount. They had already determined the critical high volume air flow required to correctly produce dense iron blooms. By the point I met them, they had published their research both formally and inside blacksmithing circles.
Thanks to the wonders of the internet, the Spring 2004 smelt at Wareham had a special guest, Michael McCarthy from Cooperstown NY. Mike had been smelting at the Farmer's Museum, basing his furnaces on Colonial American models. He was actually on his way back home from spending a week building and operating a Japanese tatara furnace. Although yet again tour smelt was a complete failure, a solid friendship was struck up.
Mike would organize the first Early Iron symposium at the Farmer's Museum in Fall of 2004. This gathered together Lee & Skip, Mike and myself as demonstrators, each building and operating a furnace from our various traditions. My (quite unplanned) contribution was a Norse style short shaft.
 the "Gangue of Fer"
(L-R) Sauder, Williams, McCarthy, myself (back)
Early Iron 1 - Cooperstown NY, 2004
Setting the Record Straight!
Part of the project grant was specifically to cover my participation in Smeltfest 2012, hosted by Lee Sauder at his Germinal Ironworks outside Lexington Virginia.
Lee, assisted by his close friend and smelting partner Skip Williams, started investing historic bloomery iron smelting methods in the 1990's. They were initially inspired by African models, then worked backwards to establish a functional and predictable technique.
 Sauder & Williams, pulling a bloom from their 'African Queen' furnace.
Frontier Culture Museum, Stauton VA - 2002
I had the good fortune to meet Lee and Skip in Fall of 2002. I had only undertaken two smelts at that point, both unsuccessful. They were extremely generous with their knowledge and folding my small group (other members of DARC) into their demonstration. Although we did little more than help with some of the 'dirty jobs' I certainly learned an immense amount. They had already determined the critical high volume air flow required to correctly produce dense iron blooms. By the point I met them, they had published their research both formally and inside blacksmithing circles.
Thanks to the wonders of the internet, the Spring 2004 smelt at Wareham had a special guest, Michael McCarthy from Cooperstown NY. Mike had been smelting at the Farmer's Museum, basing his furnaces on Colonial American models. He was actually on his way back home from spending a week building and operating a Japanese tatara furnace. Although yet again tour smelt was a complete failure, a solid friendship was struck up.
Mike would organize the first Early Iron symposium at the Farmer's Museum in Fall of 2004. This gathered together Lee & Skip, Mike and myself as demonstrators, each building and operating a furnace from our various traditions. My (quite unplanned) contribution was a Norse style short shaft.
 the "Gangue of Fer"
(L-R) Sauder, Williams, McCarthy, myself (back)
Early Iron 1 - Cooperstown NY, 2004
Late Winter of 2005 would mark the first of the invitational Smeltfest events hosted by Lee. Initially this was just the small group of us, concentrating on some specific aspect of furnace construction or smelting method.
Over the years a number of functional problems have been proposed and tested. These methods have then been incorporated in the continuing work of all three teams. A growing group of other enthusiasts have been included and have contributed. The core these days includes Jesus Hernandez, Shelton Browder and Steve Mankowski. Smeltfest has been fortunate to have include a number of wide flung guests on a more irregular basis, including some that have travelled a fair distance to participate. (Recent years have included Jake Keen, Tim Young and Therese Kearns from England, Jeff Pringle from California.)
In truth, the Early Iron group acts much like a think tank - with a solid practical workshop aspect. Evenings are spent in brainstorming ideas, with the raw energy of being gathered from isolation into a group of fellow enthusiasts. Days are spent testing out suggested concepts. The combination of experiences, interests and personal skills provides a unique and often intense, learning experience for us all.
My single largest contribution to the overall endeavor has been with documenting and publishing the discoveries. Almost always I am *not* the originator of these ideas. In practical work, I am typically just a 'worker bee' rather than a team leader.
I do make every attempt to make sure credit is given where credit is due.
(This clarification arose from some secondary mentions of yesterday's blog post. Tomorrow I will expand on those additional comments.)
Over the years a number of functional problems have been proposed and tested. These methods have then been incorporated in the continuing work of all three teams. A growing group of other enthusiasts have been included and have contributed. The core these days includes Jesus Hernandez, Shelton Browder and Steve Mankowski. Smeltfest has been fortunate to have include a number of wide flung guests on a more irregular basis, including some that have travelled a fair distance to participate. (Recent years have included Jake Keen, Tim Young and Therese Kearns from England, Jeff Pringle from California.)
In truth, the Early Iron group acts much like a think tank - with a solid practical workshop aspect. Evenings are spent in brainstorming ideas, with the raw energy of being gathered from isolation into a group of fellow enthusiasts. Days are spent testing out suggested concepts. The combination of experiences, interests and personal skills provides a unique and often intense, learning experience for us all.
My single largest contribution to the overall endeavor has been with documenting and publishing the discoveries. Almost always I am *not* the originator of these ideas. In practical work, I am typically just a 'worker bee' rather than a team leader.
I do make every attempt to make sure credit is given where credit is due.
(This clarification arose from some secondary mentions of yesterday's blog post. Tomorrow I will expand on those additional comments.)
Tuesday, April 10, 2012
Crossover - Slag Rings in Archaeology?
The impact of an OAC project grant may extend well past the intended application.
My interest in bloomery iron started with the historic process of making the iron. Although there are some scattered living traditions (notably in Africa and India), these are fragmentary at best. For Europe, the technology of making iron has changed significantly since 1000 AD, with several pronounced shifts in method, equipment and type of metal produced. In attempting to re-discover what is a 'lost' tradition, modern researchers and practitioners are guided by very limited archaeological remains alone.
The best experimental archaeology may offer insights into how to interpret what may be puzzling artifact remains.
These are some shots of slag rings recovered from two of our recent smelts (at Smeltfest 2012, Lexington VA, March 2012)
Lee Sauder has been using a heavy forged copper tuyere on all his smelts for the last several years. I'm not entirely sure just why he came up with this innovation. I believe it was in attempt to find a durable solution to the problem how the high temperatures inside the iron smelting furnaces were melting off the ceramic and steel pipe tuyeres then in use.
His tuyere was forged from a solid copper plate roughly 3/8 inch thick. First the piece was cross peened along the long axis to both spread and thin the rectangle into a triangle shape. Then the resulting form was wrapped into a cone. The finished cone is roughly 2 cm ID on the furnace end, about 4 cm ID on the bellows end. The piece is maybe about 40 cm long altogether. The closing seam is just butted together (not fused or entirely air tight).
 Lee's clay 'medium shaft' production furnace.
The conical forged copper tuyere can be seen to the right
In use, what happens is that the heat the tuyere end is subjected to quickly travels back to the larger end exposed outside the furnace. The combination of radiation to the outside air, and rushing cold air down the inside surface, all combines to keep the tuyere end well before the slumping or melting point of the copper material. The result is virtually no effect to the the copper tuyere, even after many firing sequences. I think Lee has used this same tuyere for something like 30 smelts, with no damage at all!


The slag will harden to a shell around the tip of the tuyere. These rings do not solidly attach fuse to the copper, normally hand pressure will break them clear.
You can see that both the internal and external diameters are indicated in the slag rings.
You can determine the upper and lower surfaces, with the heavier accumulation on the 'up' side of the tuyere in the furnace.
You can get some estimate of the tuyere angle. The slag has formed proud of the furnace wall, so if you assume the inner wall to be vertical, the inside surface does record the tuyere angle.

Inner surface (inverted here)
The inner diameter and thickness of tuyere can be determined.
Both the rings show cracking in roughly the same place. I think this is an effect of the cooling rate of the slag and the shape of the rings. One of the collected rings had in fact separated into two pieces ( the ring on the left in the images above).
 One ring was broken into two pieces
We have worked with ceramic tube tuyeres as standard here for the last while. These are uniform, cheap and fairly durable. They also are quite obvious as a physical remain. Same goes for the iron (steel pipe) tubes we have also made use of. As the iron tuyeres are consumed with every smelt, I don't think that this material likely for VA process - just from a practical standpoint. (wasting iron to make iron?)
Copper tuyeres might be another mater. They would be 'relatively expensive' as objects, but because of their proven durability would be worth the investment for repeated smelt operations. The copper would be too valuable to discard, likely just being cut up as raw material for bronze production at the end of their smelting use. Any finds of copper cut to rings as a bronze related find? It would be the easy way to re-cycle the material.
Anyway, the slag rings are quite distinctive. Lee said he gets these every time. Worth a check against remains?? (Kevin Smith had mentioned that he had recovered some semi circular slag fragments from his excavation of an 'industrial' VA iron smelting site at Hals in Iceland. It will be interesting to see if these modern pieces in any way resemble his artifacts.)
We messed with using a copper tuyere a long while back, but at the time I did not have any heavy copper bar or sheet. The copper tuyere I made up was only 1/8 thick material, and did not transmit heat fast enough to keep the end from melting back to the furnace wall. This would have certainly produced some droplets of copper into the slag someplace. Perhaps another signature to look for in the archaeology?
(Modified from the initial posting on Hammered Out Bits)
My interest in bloomery iron started with the historic process of making the iron. Although there are some scattered living traditions (notably in Africa and India), these are fragmentary at best. For Europe, the technology of making iron has changed significantly since 1000 AD, with several pronounced shifts in method, equipment and type of metal produced. In attempting to re-discover what is a 'lost' tradition, modern researchers and practitioners are guided by very limited archaeological remains alone.
The best experimental archaeology may offer insights into how to interpret what may be puzzling artifact remains.
***********
These are some shots of slag rings recovered from two of our recent smelts (at Smeltfest 2012, Lexington VA, March 2012)
Lee Sauder has been using a heavy forged copper tuyere on all his smelts for the last several years. I'm not entirely sure just why he came up with this innovation. I believe it was in attempt to find a durable solution to the problem how the high temperatures inside the iron smelting furnaces were melting off the ceramic and steel pipe tuyeres then in use.
His tuyere was forged from a solid copper plate roughly 3/8 inch thick. First the piece was cross peened along the long axis to both spread and thin the rectangle into a triangle shape. Then the resulting form was wrapped into a cone. The finished cone is roughly 2 cm ID on the furnace end, about 4 cm ID on the bellows end. The piece is maybe about 40 cm long altogether. The closing seam is just butted together (not fused or entirely air tight).
 Lee's clay 'medium shaft' production furnace.
The conical forged copper tuyere can be seen to the right
In use, what happens is that the heat the tuyere end is subjected to quickly travels back to the larger end exposed outside the furnace. The combination of radiation to the outside air, and rushing cold air down the inside surface, all combines to keep the tuyere end well before the slumping or melting point of the copper material. The result is virtually no effect to the the copper tuyere, even after many firing sequences. I think Lee has used this same tuyere for something like 30 smelts, with no damage at all!

As the rings would sit against the furnace wall

Inverted, showing the slag and ore fragments on the top surface
The slag will harden to a shell around the tip of the tuyere. These rings do not solidly attach fuse to the copper, normally hand pressure will break them clear.
You can see that both the internal and external diameters are indicated in the slag rings.
You can determine the upper and lower surfaces, with the heavier accumulation on the 'up' side of the tuyere in the furnace.
You can get some estimate of the tuyere angle. The slag has formed proud of the furnace wall, so if you assume the inner wall to be vertical, the inside surface does record the tuyere angle.

Inner surface (inverted here)
The inner diameter and thickness of tuyere can be determined.
Both the rings show cracking in roughly the same place. I think this is an effect of the cooling rate of the slag and the shape of the rings. One of the collected rings had in fact separated into two pieces ( the ring on the left in the images above).
 One ring was broken into two pieces
We have worked with ceramic tube tuyeres as standard here for the last while. These are uniform, cheap and fairly durable. They also are quite obvious as a physical remain. Same goes for the iron (steel pipe) tubes we have also made use of. As the iron tuyeres are consumed with every smelt, I don't think that this material likely for VA process - just from a practical standpoint. (wasting iron to make iron?)
Copper tuyeres might be another mater. They would be 'relatively expensive' as objects, but because of their proven durability would be worth the investment for repeated smelt operations. The copper would be too valuable to discard, likely just being cut up as raw material for bronze production at the end of their smelting use. Any finds of copper cut to rings as a bronze related find? It would be the easy way to re-cycle the material.
Anyway, the slag rings are quite distinctive. Lee said he gets these every time. Worth a check against remains?? (Kevin Smith had mentioned that he had recovered some semi circular slag fragments from his excavation of an 'industrial' VA iron smelting site at Hals in Iceland. It will be interesting to see if these modern pieces in any way resemble his artifacts.)
We messed with using a copper tuyere a long while back, but at the time I did not have any heavy copper bar or sheet. The copper tuyere I made up was only 1/8 thick material, and did not transmit heat fast enough to keep the end from melting back to the furnace wall. This would have certainly produced some droplets of copper into the slag someplace. Perhaps another signature to look for in the archaeology?
(Modified from the initial posting on Hammered Out Bits)
Saturday, April 7, 2012
Listening to the expert

If there is one name you will see over and over here, its Lee Sauder.
Lee, working with his smelt partner Skip Williams is most certainly the single most experienced bloomery iron worker in North America. I'd lay money he's the best counting the Europeans too. He is one of the other core driving members of the recent 'Early Iron' movement. There is no doubt that had I never met him, I would have given up on my own efforts to understand Norse iron smelting years ago.
Bearing in mind yesterdays long description of a working series with a bloom (and what went wrong) here is a link to what Lee has written as advise on the process :
Sauder's Bloom Forging Hints
If any readers wish to ease into working with bloomery iron, but are uncertain about plunging right into furnace construction (and the uncertainties of iron smelting), Lee also sells partial bloom sections and worked up bars :
Bloom Iron Sales
Home Grown, Organic, Free Range Iron Fresh from the Furnace!
Monday, March 26, 2012
Smelting at Smeltfest
This clip shot by participant Jesus Herandez
This clip from our third smelt during Smeltfest 12 shows a number of reasons why my participation there is valuable (to me!).
The concentration at Smeltfest this year was in part on working with a new magnetite ore.
On our first smelt, we did not produce any iron. After some consideration, the thought was that we had purified the ore (double magnetic sorting) too much, not leaving enough glass producing elements to create the correct working slag bath inside the furnace.
On the second smelt, the result was a (quite surprising) 'white' cast iron. Not what we expected at all.
On the third smelt seen here, the result was a solid bloom of a middle carbon steel. Perfect!
You get some idea of how a well skilled *team* is the ideal situation, as well as having access to some large scale equipment.
During the extraction itself, Lee Sauder is managing the opening of the furnace and pulling the bloom. I normally work as 'safety man' - shovelling away hot fragments and burning charcoal, plus keeping the tools close at hand and in some kind of order.
As soon as Lee extracts, the bloom is weighed (on a large scale) and then quickly transferred to a thick steel plate set into the ground. At this point two hammer men (Steve Mankowski and Shelton Browder here) strike over the surface to both knock off the loose slag. and compact in any looser bloom fragments. (1)
At that point the bloom is loosing its initial heat. You see the action jump into the main forge area, where Lee has set up a special side draft coal forge. Once re-heated back to a welding temperature, again Steve and Shelton hammer the surface, increasing force as they compact the bloom further.
Next the bloom is transferred over to Lee's 300 pound mechanical hammer. Not only massive power, but also this hammer has an extremely large working surface. You see the bloom compressed into a puck, then that flat disk cut into quarters using a pair of specially designed cutters under the power hammer. (2)
Last, there is a sequence showing Skip Williams spark testing a still hot quarter section to determine carbon content. (3)
Just to prove there is still more art than science in bloom smelting, our fourth attempt *should* have produced another flow of high carbon cast iron. The result? Middle carbon steel again, although not with the same yield or consistency as smelt 3.
Hmm - some more consideration and experimentation seems in order here!
Meanwhile, back to Wareham :
1) The team I normally work with at Wareham does not regularly include any trained blacksmiths. I'm usually pretty much exhausted by the time I get a bloom pulled. So my normal ability to make the best use of the extreme heat of a freshly extracted bloom is quite limited.
On any secondary attempt to heat and work a bloom mass , I rarely have any assistance - so must hold and cut working alone.
2) The small air hammer in my shop is only 50 pounds head weight. More significantly, it has a very small working table, only 4 x 1 1/2 inches. This makes it extremely difficult to balance an irregular bloom and compress or work it.
This is why the start of the Bloom to Bar project has been taken up by preparing a new 30 ton hydraulic press.
3) My objective (like the historic one) has been to produce a *low* carbon iron. This softer material is much easier to forge into objects.
The concentration at Smeltfest this year was in part on working with a new magnetite ore.
On our first smelt, we did not produce any iron. After some consideration, the thought was that we had purified the ore (double magnetic sorting) too much, not leaving enough glass producing elements to create the correct working slag bath inside the furnace.
On the second smelt, the result was a (quite surprising) 'white' cast iron. Not what we expected at all.
On the third smelt seen here, the result was a solid bloom of a middle carbon steel. Perfect!
You get some idea of how a well skilled *team* is the ideal situation, as well as having access to some large scale equipment.
During the extraction itself, Lee Sauder is managing the opening of the furnace and pulling the bloom. I normally work as 'safety man' - shovelling away hot fragments and burning charcoal, plus keeping the tools close at hand and in some kind of order.
As soon as Lee extracts, the bloom is weighed (on a large scale) and then quickly transferred to a thick steel plate set into the ground. At this point two hammer men (Steve Mankowski and Shelton Browder here) strike over the surface to both knock off the loose slag. and compact in any looser bloom fragments. (1)
At that point the bloom is loosing its initial heat. You see the action jump into the main forge area, where Lee has set up a special side draft coal forge. Once re-heated back to a welding temperature, again Steve and Shelton hammer the surface, increasing force as they compact the bloom further.
Next the bloom is transferred over to Lee's 300 pound mechanical hammer. Not only massive power, but also this hammer has an extremely large working surface. You see the bloom compressed into a puck, then that flat disk cut into quarters using a pair of specially designed cutters under the power hammer. (2)
Last, there is a sequence showing Skip Williams spark testing a still hot quarter section to determine carbon content. (3)
Just to prove there is still more art than science in bloom smelting, our fourth attempt *should* have produced another flow of high carbon cast iron. The result? Middle carbon steel again, although not with the same yield or consistency as smelt 3.
Hmm - some more consideration and experimentation seems in order here!
Meanwhile, back to Wareham :
1) The team I normally work with at Wareham does not regularly include any trained blacksmiths. I'm usually pretty much exhausted by the time I get a bloom pulled. So my normal ability to make the best use of the extreme heat of a freshly extracted bloom is quite limited.
On any secondary attempt to heat and work a bloom mass , I rarely have any assistance - so must hold and cut working alone.
2) The small air hammer in my shop is only 50 pounds head weight. More significantly, it has a very small working table, only 4 x 1 1/2 inches. This makes it extremely difficult to balance an irregular bloom and compress or work it.
This is why the start of the Bloom to Bar project has been taken up by preparing a new 30 ton hydraulic press.
3) My objective (like the historic one) has been to produce a *low* carbon iron. This softer material is much easier to forge into objects.
Wednesday, February 29, 2012
Bloom to Bar?
(Day 14)
Bloom iron has a physical texture and integral chemistry quite different from modern industrially produced steels.
Both of these are a result of the creation process, the reduction of raw iron oxide ore inside the direct process bloomery furnace. (see Day 11)
As the individual particles of metallic iron sinter together at the bottom of the furnace, they are accumulating inside a pool of liquid glassy slag. If you stopped this process early in the sequence, then cut open the mass, what you would find is something that looks like this:
 'Proto-Bloom' - Early Iron 1, 2004
Preparation, Description & Images by Elizabeth Henricks
Bloom iron has a physical texture and integral chemistry quite different from modern industrially produced steels.
Both of these are a result of the creation process, the reduction of raw iron oxide ore inside the direct process bloomery furnace. (see Day 11)
As the individual particles of metallic iron sinter together at the bottom of the furnace, they are accumulating inside a pool of liquid glassy slag. If you stopped this process early in the sequence, then cut open the mass, what you would find is something that looks like this:
 'Proto-Bloom' - Early Iron 1, 2004
Preparation, Description & Images by Elizabeth Henricks
The iron starts to collect together with the matrix of the slag, almost like soap bubbles.
As more and more iron accumulates, the developing bloom will become denser and denser. At first the bloom is very lacy, almost as much slag as iron. This is especially the situation with furnaces utilizing low volume, low pressure air blasts.
The iron of course is considerably heavier than the slag. So as more and more is reduced and it clumps together, it presses out more and more of the slag. The ideal is to create a dense 'puck' of metal. The classic shape is 'plano-convex' - a slightly oval half sphere with a flat top :

Now, the ideal bloom will be very dense, but some of the slag always remains trapped inside the metallic mass:
 Vinland 1 - May 2009 (4.9 KG)
Sliced in half, surface polished (upside down in photo)
As more and more iron accumulates, the developing bloom will become denser and denser. At first the bloom is very lacy, almost as much slag as iron. This is especially the situation with furnaces utilizing low volume, low pressure air blasts.
The iron of course is considerably heavier than the slag. So as more and more is reduced and it clumps together, it presses out more and more of the slag. The ideal is to create a dense 'puck' of metal. The classic shape is 'plano-convex' - a slightly oval half sphere with a flat top :

Vinland 2- October 2009 (5.6 KG)
Side view, showing rough placement in the furnace.
Side view, showing rough placement in the furnace.
Now, the ideal bloom will be very dense, but some of the slag always remains trapped inside the metallic mass:
 Vinland 1 - May 2009 (4.9 KG)
Sliced in half, surface polished (upside down in photo)
The raw bloom thus will have both voids and inclusions of slag. The better the skill of the smelt master, the denser / more solid the bloom will be. Remember that historically, the objective of whole smelting process is to produce working bars of solid iron metal (!).
 Replica Viking Age 'Currency Bar'
Forged down from bloom (November 2005 smelt)
 Replica Viking Age 'Currency Bar'
 Forged down from bloom (November 2005 smelt)
This process, 'Bloom to Bar' represents an entirely different stage of the iron production sequence.
Individual raw blooms will vary considerably how lacy or solid they may be. The actual carbon alloy content is likely to vary, even across the same bloom (more on that later).
The process of forging a bloom down to a working bar involves compacting, cutting, folding and welding. It is to gain more direct experience with this aspect of the overall process that this OAC Grant is supporting.
Readers may be noticing a bit of disorganization between the individual postings (hopefully not too much *within* individual postings!). This is because my attempt to provide a daily commentary does mean I am jumping around in terms of actual subjects (rather than a concise continuing narrative). The topic of the daily posts most often does not reflect the physical work being undertaken on that same day.
Individual raw blooms will vary considerably how lacy or solid they may be. The actual carbon alloy content is likely to vary, even across the same bloom (more on that later).
The process of forging a bloom down to a working bar involves compacting, cutting, folding and welding. It is to gain more direct experience with this aspect of the overall process that this OAC Grant is supporting.
Readers may be noticing a bit of disorganization between the individual postings (hopefully not too much *within* individual postings!). This is because my attempt to provide a daily commentary does mean I am jumping around in terms of actual subjects (rather than a concise continuing narrative). The topic of the daily posts most often does not reflect the physical work being undertaken on that same day.
Why Bloom Iron ?- five
(Day 17)
The second distinctive characteristic of bloomery iron is variation in carbon content.
(This is going to be a bit technical for the non-metalsmiths.)
Carbon has a major effect on iron when it is added (alloyed) to the metal. Even small amounts of carbon drastically effect the relative resistance to deforming (effectively the hardness). Some modern metals with their approximate carbon contents:
'Electric Iron' ( a low carbon Bessemer steel, used for transformer cores) - about 0.05 % Carbon
Mild steel (what most everything is made of, from cars to I beams) - about 0.2 % Carbon
Spring steel (old leaf and coil springs in autos, heavy cutting tools) - about 0.5 % Carbon
Tool steel (small, sharp cutting edges) - about 1.0 % Carbon
Cast Iron (cookware, stoves) - about 2.0 % Carbon
Because iron alloyed with carbon resists forming - it will get increasingly more difficult to actually forge (hot hammer) shapes. In the pre-Industrial Age world, the ideal iron for the blacksmith had as *little* carbon in it as possible.
You can see that this works in direct opposition to the requirements of the blade maker. For a durable cutting edge, you would want some amount of carbon present. Hardness equals edge holding ability. Also the complex series of heat treating methods apply to Carbon alloys. (A topic for *much* later!)
Remember our idealized direct process bloomery furnace:
 Carbon is *not* present in the starting iron oxide ore.
Carbon may be absorbed by the reduced metallic iron in two ways:
First, directly to the surface of the individual particles as they fall down the body of the furnace. This is most commonly found with very small particle size ore, or with a furnace that is allowed to run too hot.
The second place carbon can come from is into the surface of the bloom, as it sits inside the liquid slag in the bowl at the bottom of the furnace. This is a slower process, so the carbon tends to diffuse from the outer layers towards the centre.
With larger blooms, the effective ratio of surface area to internal volume is lower. So this carbon variation effect tends to be more obvious with smaller blooms.
Also, the quality of the individual bloom comes into play. The folding and re-welding process will tend to 'average out' variations in carbon content ('carbon migration'). There can also be carbon absorbed from the fuel during repeated welding heats.
Ok - enough theory - what is the practical effect:
 Bloom Buckle - Winter 2011
Forged from a small bloom fragment
The variation in colours seen over the surface of 'Bloom Buckle' is a direct result of variations in carbon content within the metal. As a small fragment, the original metal was more drastically effected by carbon diffusion across its surface (high area to volume ratio).
The finished buckle was water hardened, then etched with a Ferric Chloride solution to highlight the differences in carbon content. (This is a variation on the process used for my layered steel knives.)
This is another effect which I intend on exploring (if time permits) within the framework of the OAC Grant.
Note to Readers :
The Arts is well known for its (often inpennetrable ) jargon. You may have noticed I don't tent to use this 'Language of the Artist'. What you will find here is a tendency to technical jargon - itself often poorly understood (and frequently *improperly* used). I would refer you to my commentary piece 'Defining the Artist Blacksmith'.
The second distinctive characteristic of bloomery iron is variation in carbon content.
(This is going to be a bit technical for the non-metalsmiths.)
Carbon has a major effect on iron when it is added (alloyed) to the metal. Even small amounts of carbon drastically effect the relative resistance to deforming (effectively the hardness). Some modern metals with their approximate carbon contents:
'Electric Iron' ( a low carbon Bessemer steel, used for transformer cores) - about 0.05 % Carbon
Mild steel (what most everything is made of, from cars to I beams) - about 0.2 % Carbon
Spring steel (old leaf and coil springs in autos, heavy cutting tools) - about 0.5 % Carbon
Tool steel (small, sharp cutting edges) - about 1.0 % Carbon
Cast Iron (cookware, stoves) - about 2.0 % Carbon
Because iron alloyed with carbon resists forming - it will get increasingly more difficult to actually forge (hot hammer) shapes. In the pre-Industrial Age world, the ideal iron for the blacksmith had as *little* carbon in it as possible.
You can see that this works in direct opposition to the requirements of the blade maker. For a durable cutting edge, you would want some amount of carbon present. Hardness equals edge holding ability. Also the complex series of heat treating methods apply to Carbon alloys. (A topic for *much* later!)
Remember our idealized direct process bloomery furnace:
 Carbon is *not* present in the starting iron oxide ore.
Carbon may be absorbed by the reduced metallic iron in two ways:
First, directly to the surface of the individual particles as they fall down the body of the furnace. This is most commonly found with very small particle size ore, or with a furnace that is allowed to run too hot.
The second place carbon can come from is into the surface of the bloom, as it sits inside the liquid slag in the bowl at the bottom of the furnace. This is a slower process, so the carbon tends to diffuse from the outer layers towards the centre.
With larger blooms, the effective ratio of surface area to internal volume is lower. So this carbon variation effect tends to be more obvious with smaller blooms.
Also, the quality of the individual bloom comes into play. The folding and re-welding process will tend to 'average out' variations in carbon content ('carbon migration'). There can also be carbon absorbed from the fuel during repeated welding heats.
Ok - enough theory - what is the practical effect:
 Bloom Buckle - Winter 2011
Forged from a small bloom fragment
The variation in colours seen over the surface of 'Bloom Buckle' is a direct result of variations in carbon content within the metal. As a small fragment, the original metal was more drastically effected by carbon diffusion across its surface (high area to volume ratio).
The finished buckle was water hardened, then etched with a Ferric Chloride solution to highlight the differences in carbon content. (This is a variation on the process used for my layered steel knives.)
This is another effect which I intend on exploring (if time permits) within the framework of the OAC Grant.
Note to Readers :
The Arts is well known for its (often inpennetrable ) jargon. You may have noticed I don't tent to use this 'Language of the Artist'. What you will find here is a tendency to technical jargon - itself often poorly understood (and frequently *improperly* used). I would refer you to my commentary piece 'Defining the Artist Blacksmith'.
Sunday, February 26, 2012
How to make Bloomery Iron
(day 11)
How *do* you make bloomery iron?
Without getting into fine detail, this is a fast description of how it works:


 Typical Experimental Iron Smelt set up.
Industrial blower, air gate and metering system, hose to T shaped viewing port in turn attached to tuyere.
Clay 'Short Shaft' furnace, with charcoal fuel stacked ready to consume.
Vinland 1 - May 2009 (Go on for details)
Readers interested in far more detail on bloomery iron making are referred to the Wareham Forge Experimental Iron Smelting web site.
Of special interest will be a couple of fast working guides to building and running an iron smelting furance:
As work with the individual blooms progresses, there will be references back to the individual smelt events which produced each bloom.
Readers may notice a couple of things: First, the grand plan of a blog post every day obviously got overtaken by the flow of other work. Second, days worked on the project bear little resemblance to any kind of 'normal' (M-F) work week. Such is the real life of the artisan!
How *do* you make bloomery iron?
Without getting into fine detail, this is a fast description of how it works:

"Briefly, the furnace is a cylinder of clay filled with charcoal, with high combustion temperatures supported by the injection of air into the base of the furnace. Once fully ignited, ore is added in small batches, while keeping the shaft filled with charcoal. Burning charcoal creates superheated carbon monoxide (CO) gas, which reacts with the iron oxide (Fe2O3) contained in the ore. In effect, the more reactive CO rips off the oxygen, leaving metallic iron behind. This iron is heavier, so it falls to the base of the furnace. A liquid glassy slag also forms, composed of melted furnace wall, silica from the ore, and charcoal ash. Falling to the colder base of the furnace, it congeals, forming a bowl shape. The descending iron particles collect inside the liquid pool of slag within this bowl into the bloom mass. Excess slag may have to be tapped off to prevent blocking the air flow at the tuyere. The bloom is finally extracted while hot, either through the top or bottom side of the furnace, then hammered to consolidate it."

" There is a relationship between furnace size, position of the air system, air volume required, the nature and size of the ore particles, the size of the charcoal fuel, and the best sequence of adding both charcoal and ore. Changing any one of these variables will alter the nature of the bloom produced. Using the wrong combination may result in there being no effective production of iron at all. "
The quoted sections are from my just published article 'If You Don't Get Any IRON..." in the journal 'EXARC'
 Typical Experimental Iron Smelt set up.
Industrial blower, air gate and metering system, hose to T shaped viewing port in turn attached to tuyere.
Clay 'Short Shaft' furnace, with charcoal fuel stacked ready to consume.
Vinland 1 - May 2009 (Go on for details)
Readers interested in far more detail on bloomery iron making are referred to the Wareham Forge Experimental Iron Smelting web site.
Of special interest will be a couple of fast working guides to building and running an iron smelting furance:
the Econo Norse Smelter | 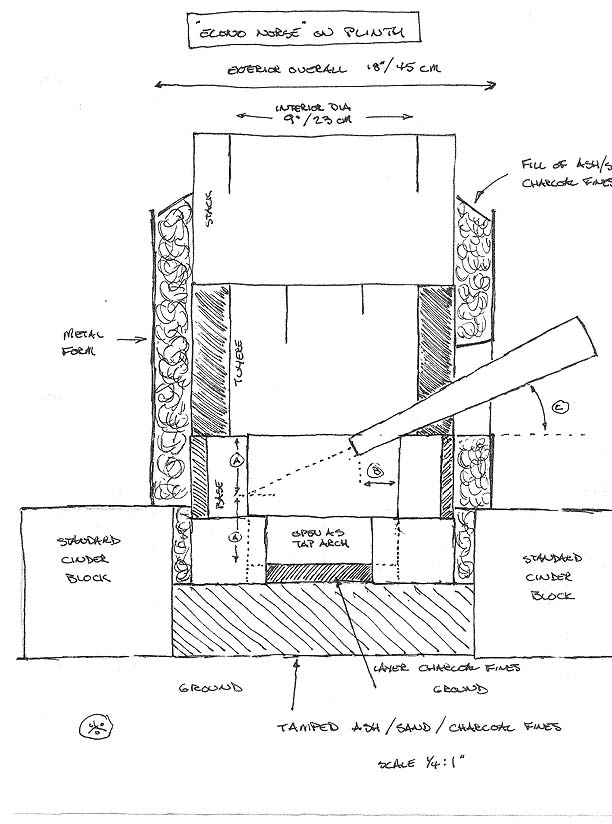 |
| the Flue Tyle Smelter | 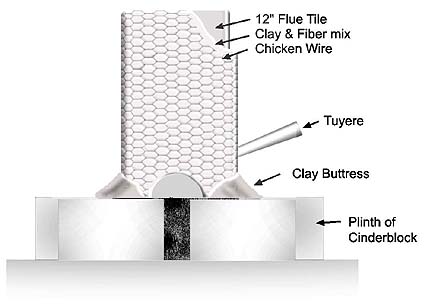 |
As work with the individual blooms progresses, there will be references back to the individual smelt events which produced each bloom.
Readers may notice a couple of things: First, the grand plan of a blog post every day obviously got overtaken by the flow of other work. Second, days worked on the project bear little resemblance to any kind of 'normal' (M-F) work week. Such is the real life of the artisan!
Tuesday, February 21, 2012
Why Bloom Iron ?- one
(day 4)
The Project centres on the use of Bloomery Iron.
Right now I am in the 'shop re-organization and equipment set up' phase. This of itself may not be that interesting (although I will cover these aspects in later postings).
Bloomery iron is made by the direct reduction process, which is quite different than how our modern metals are made. This results in a metal which is also distinctively different than our modern alloys.
How modern mild steel is made:
 The Bessemer Blast furnace : post 1855
How 'antique' wrought iron was made:
 The Blast Furnace : post circa 1600
Specific product shown is high carbon 'cast' iron.
How 'historic' wrought iron was made:

How 'ancient' bloomery iron was made:
 'Short Shaft' Bloomery Furnace, circa 600 - 1000
Product is spongy metal with slag inclusions.
(Image by P. Halasz)
The Project centres on the use of Bloomery Iron.
Right now I am in the 'shop re-organization and equipment set up' phase. This of itself may not be that interesting (although I will cover these aspects in later postings).
Bloomery iron is made by the direct reduction process, which is quite different than how our modern metals are made. This results in a metal which is also distinctively different than our modern alloys.
How modern mild steel is made:
 The Bessemer Blast furnace : post 1855
How 'antique' wrought iron was made:
 The Blast Furnace : post circa 1600
Specific product shown is high carbon 'cast' iron.

Introduction of Water Power, post circa 1000
Actually a two step process, A 'finery' used for removal of excess carbon
Actually a two step process, A 'finery' used for removal of excess carbon
How 'ancient' bloomery iron was made:
 'Short Shaft' Bloomery Furnace, circa 600 - 1000
Product is spongy metal with slag inclusions.
(Image by P. Halasz)
The method that has been researched (through much trial and error) is based on this last 'ancient' furnace technology. The raw materials for this Project have been created using these methods.
There is a direct Canadian historical connection. The very first iron produced in Canada was made at L'Anse aux Meadows (Vinland) by the Greenland Norse about 1000 AD (late Viking Age). For more information on the early research into this specific process, see 'An Iron Smelt at Vinland'
The image above shows me working with staff from Parks Canada (Mark Pilgrim, left) and my own Dark Ages Re-creation Company (Dave Cox, centre rear) at L'Anse aux Meadows NHSC in 2010. A full re-creation of that original iron smelt was mounted, using all Viking Age tools and methods.
The other images above sourced over the open internet
There is a direct Canadian historical connection. The very first iron produced in Canada was made at L'Anse aux Meadows (Vinland) by the Greenland Norse about 1000 AD (late Viking Age). For more information on the early research into this specific process, see 'An Iron Smelt at Vinland'
The image above shows me working with staff from Parks Canada (Mark Pilgrim, left) and my own Dark Ages Re-creation Company (Dave Cox, centre rear) at L'Anse aux Meadows NHSC in 2010. A full re-creation of that original iron smelt was mounted, using all Viking Age tools and methods.
The other images above sourced over the open internet
Thursday, February 16, 2012
Why? A Historical reference.
(Day Two)
So - why is important that someone is working with bloomery iron?
It is fair to say that to understand were we are going, there needs to be a consideration of where we have come from.
The following is altered from a much longer commentary I wrote this morning for the NORSEFOLK discussion group.
First (and most importantly) the standard metal used up to the Medieval Period is *bloomery iron*. This metal is soft, has a stringy texture with slag inclusions. Individual pieces would vary considerably in physical consistency. Carbon content would vary not only from piece to piece, but also *within an individual bar*. We modern smiths are completely dependant on mass produced, scientifically refined, industrially consistent (cheap!) metal alloys. These are produced using variations on the Bessemer furnace, only introduced in 1855.
There is a fuller commentary on 'traditional' versus modern metals on the main Wareham Forge web site : 'Wrought Iron - what it really is, what it really means'
(I get very aggravated by contemporary bladesmiths who have adopted bloomery iron making, building on the work of those who developed the current methods being used - and obviously not understanding them. Making bloom iron is *not* about alloy control, it is about creating a physical texture in the metal.)
Modern commentators looking at traditional practices often use the term 'ritually' in place of a better description 'based on experience'. Our concept of 'ritual' is most certainly far different than ancient / non Western concepts. 'What you do if you want things to work' - in our world we would call this science.
An experienced smith knows that when you quench different pieces of iron metals from orange in water, there can be changes in how it breaks when cold hammered. The exposed surfaces can have different colours and textures. Metal that is thus treated, then found to be brittle, have a surface of small crystals, and a bright, light grey colour - that material also makes for a hard / durable cutting edge.
(This selection of materials based on physical appearance is the core of the Japanese traditional method. Consider - How do you spark test for carbon content, a standard modern practice, in a world with no high speed grinding?)
This wide variation in the quality of the starting metal is vastly important when creating cutting edges. Examination of a large number of individual blades from the Roman to full Medieval periods has shown that the processes of quench hardening and drawing back temper were *not* universally applied by bladesmiths until much later than most would suppose. Although this fact seems counter intuitive to a modern blacksmith, my interpretation is that the variation in metal characteristics in bloomery produced iron is the reason.
Even a small 'short shaft' furnace is easily capable of producing raw iron blooms much lager than those typical of the few artifact blooms we have from before the introduction of water power (Europe, roughly 800 - 1100 AD). Early smelters were creating blooms in the 5 - 8 kg range, *limiting* potential size. This just because of the great difficulty of attempting to work larger masses of metal down to useful bars, with only stone anvils and hand powered hammers for tools.
 'Redemption' Bloom - November 2006
6.8 kg, from 19 kg combined ore and gangue
So - why is important that someone is working with bloomery iron?
It is fair to say that to understand were we are going, there needs to be a consideration of where we have come from.
The following is altered from a much longer commentary I wrote this morning for the NORSEFOLK discussion group.
First (and most importantly) the standard metal used up to the Medieval Period is *bloomery iron*. This metal is soft, has a stringy texture with slag inclusions. Individual pieces would vary considerably in physical consistency. Carbon content would vary not only from piece to piece, but also *within an individual bar*. We modern smiths are completely dependant on mass produced, scientifically refined, industrially consistent (cheap!) metal alloys. These are produced using variations on the Bessemer furnace, only introduced in 1855.
There is a fuller commentary on 'traditional' versus modern metals on the main Wareham Forge web site : 'Wrought Iron - what it really is, what it really means'
(I get very aggravated by contemporary bladesmiths who have adopted bloomery iron making, building on the work of those who developed the current methods being used - and obviously not understanding them. Making bloom iron is *not* about alloy control, it is about creating a physical texture in the metal.)
Modern commentators looking at traditional practices often use the term 'ritually' in place of a better description 'based on experience'. Our concept of 'ritual' is most certainly far different than ancient / non Western concepts. 'What you do if you want things to work' - in our world we would call this science.
An experienced smith knows that when you quench different pieces of iron metals from orange in water, there can be changes in how it breaks when cold hammered. The exposed surfaces can have different colours and textures. Metal that is thus treated, then found to be brittle, have a surface of small crystals, and a bright, light grey colour - that material also makes for a hard / durable cutting edge.
(This selection of materials based on physical appearance is the core of the Japanese traditional method. Consider - How do you spark test for carbon content, a standard modern practice, in a world with no high speed grinding?)
This wide variation in the quality of the starting metal is vastly important when creating cutting edges. Examination of a large number of individual blades from the Roman to full Medieval periods has shown that the processes of quench hardening and drawing back temper were *not* universally applied by bladesmiths until much later than most would suppose. Although this fact seems counter intuitive to a modern blacksmith, my interpretation is that the variation in metal characteristics in bloomery produced iron is the reason.
Even a small 'short shaft' furnace is easily capable of producing raw iron blooms much lager than those typical of the few artifact blooms we have from before the introduction of water power (Europe, roughly 800 - 1100 AD). Early smelters were creating blooms in the 5 - 8 kg range, *limiting* potential size. This just because of the great difficulty of attempting to work larger masses of metal down to useful bars, with only stone anvils and hand powered hammers for tools.
 'Redemption' Bloom - November 2006
6.8 kg, from 19 kg combined ore and gangue
Subscribe to:
Posts (Atom)

February 15 - May 15, 2012 : Supported by a Crafts Projects - Creation and Development Grant
COPYRIGHT NOTICE - All posted text and images @ Darrell Markewitz.
No duplication, in whole or in part, is permitted without the author's expressed written permission.
For a detailed copyright statement : go HERE